

Chcesz sterować urządzeniami z ekosystemu SmartThings z poziomu systemu operacyjnego Windows 10 ? Niestety nie istnieje oficjalna aplikacja, choć pojawiły się plotki, że Samsung pracuje nad takim rozwiązaniem. lecz społeczność stworzyła jej prosty zamiennik. Dzisiaj przyjrzymy się jak zainstalować i skonfigurować bezpłatną aplikację SmartThingsToStart.
- [Aktualizacja 1]: Od 7 maja 2021 dostępna jest oficjalna aplikacja SmartThings na komputery z systemem Windows 10.
[UWAGA]: Aplikacja do działania na platformie SmartThings wymagała zainstalowania niestandardowych kodów obsługi. Możliwość ta została jednak wycofana. Opisana poniżej metoda nie działa już na platformie SmartThings.
Zachęcamy do zainstalowania oficjalnej aplikacji SmartThings na PC

Jak wskazuje programista:
Przypnij wszystkie urządzenia SmartThings, które mają funkcję „przełączania”, i włączaj i wyłączaj je bezpośrednio z ekranu startowego! Kafelki są aktualizowane za pomocą powiadomień push, aby odzwierciedlić aktualny stan urządzenia (wł. / wył. i kolor żarówki).
Opis ze sklepu Microsoft Store
SmartThingsToStart nie wymaga do działania posiadania centrali SmartThings, lecz wymaga również skonfigurowania „SmartApp” w Twoim Hubie.
Aplikacja SmartThingsToStart posiada dwie sekcje „Rourines” co jest pozostałością po rutynach w klasycznej aplikacji SmartThings na Androida. Nie będziemy tutaj zajmować się ich kwestią.
Drugą sekcją w aplikacji są „Devices” (Urządzenia). Tutaj pojawią się wszystkie wybrane przez nas urządzenia w toku konfiguracji aplikacji. Możemy klikając na kafelek włączać i wyłączać urządzenia. Obrazowane jest to poprzez jasny bądź ciemny kontur np. żarówki. Niestety nie posiadamy tutaj opcji na zmianę jasności, czy inne dodatkowe opcje z mobilnej aplikacji.
Instalacja
W pierwszej kolejności zainstalujmy aplikację SmartThingsToStart w systemie Windows 10. Aplikację znajdziemy w oficjalnym sklepie Microsoft Store pod tym linkiem. Po uruchomieniu aplikacji pojawia nam się instrukcja konfiguracji.
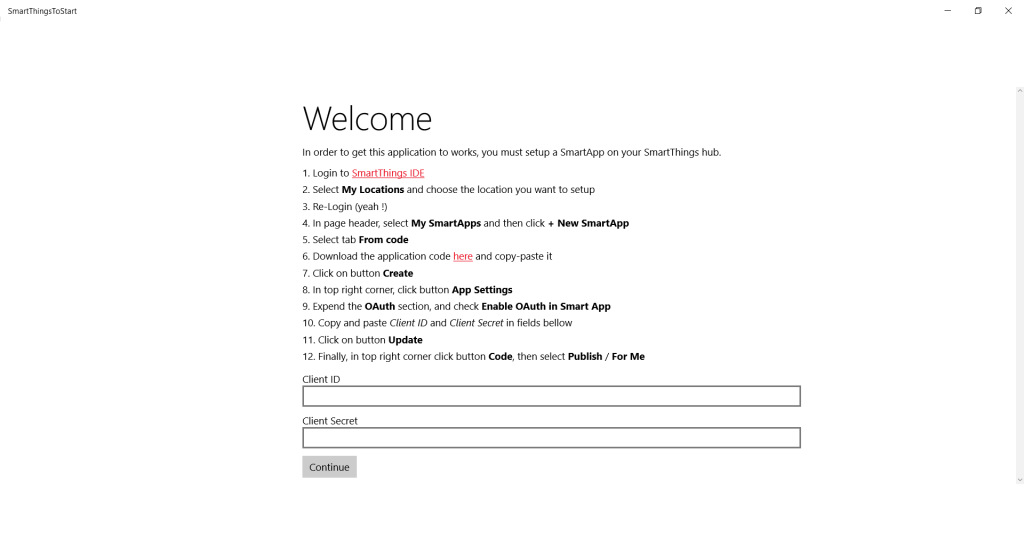
Musimy teraz uzyskać parametry „Client ID” oraz „Client Secret”. Teraz przejdziemy do instalowania SmartApps obsługującej połączenie między systemami. Pełną instrukcję dodania do ekosystemu niestandardowej SmartApps znajdziesz tutaj. Przechodząc do instalacji, logujemy się do SmartThings IDE. Po zalogowaniu.

Wchodzimy do zakładki „My SmartApps”.

Klikamy „+ New SmartApp”. Przechodzimy do zakładki „From Code”. I wklejamy poniższy kod do okna.
/**
 *  SmartThingsToStart REST Api
 *
 *  Copyright 2017 Dr1rrb
 *
 *  Licensed under the Apache License, Version 2.0 (the "License"); you may not use this file except
 *  in compliance with the License. You may obtain a copy of the License at:
 *
 *	  http://www.apache.org/licenses/LICENSE-2.0
 *
 *  Unless required by applicable law or agreed to in writing, software distributed under the License is distributed
 *  on an "AS IS" BASIS, WITHOUT WARRANTIES OR CONDITIONS OF ANY KIND, either express or implied. See the License
 *  for the specific language governing permissions and limitations under the License.
 *
 */
definition(
	name: "SmartThingsToStart",
	namespace: "torick.net",
	author: "Dr1rrb",
	description: "SmartThingsToStart REST Api",
	category: "My Apps",
	iconUrl: "http://smartthingstostartproxy.azurewebsites.net/Assets/AppLogo.png",
	iconX2Url: "http://smartthingstostartproxy.azurewebsites.net/Assets/AppLogo@2X.png",
	iconX3Url: "http://smartthingstostartproxy.azurewebsites.net/Assets/AppLogo@3X.png",
	oauth: true)


preferences {
	section("Control these devices") {
		input "switches", "capability.switch", title: "Select switches", multiple: true, required: false
		input "bubls", "capability.bulb", title: "Select bubls", hideWhenEmpty: true, multiple: true, required: false
		input "lights", "capability.light", title: "Select lights", hideWhenEmpty: true, multiple: true, required: false
		input "outlets", "capability.outlet", title: "Select outlets", hideWhenEmpty: true, multiple: true, required: false
		input "relaySwitches", "capability.relaySwitch", title: "Select relay switches", hideWhenEmpty: true, multiple: true, required: false
	}
}

mappings {
	path("/infos") {
		action: [GET: "retreiveServerInfos"]
  	}
    path("/items") {
		action: [GET: "retreiveDevicesAndRoutines"]
  	}
	path("/device/:id") {
		action: [GET: "retreiveDevice"]
	}
	path("/device/:id/subscription/:subscriptionId") {
		action: [
			PUT: "updateOrCreateSubscription",
			POST: "updateOrCreateSubscription",
		]
	}
    // TODO
	//path("/device/:id/unsubscribe") {
	//	action: [POST: "unsubscribeFromDevice"]
	//}
	path("/device/:id/:command") {
		action: [ PUT: "updateDevice" ]
	}
    path("/routine/:id/execute") {
		action: [PUT: "executeRoutine"]
	}
}

// Region: App lifecycle
def installed() {
	log.debug "Installed with settings: ${settings}"

	initialize()
}

def updated() {
	log.debug "Updated with settings: ${settings}"

	unsubscribe()
    //state.pushChannels = [:]
	initialize()
}

def initialize() {
	def channels = state.pushChannels = state.pushChannels ?: [:];
	channels.each
	{
		def device = findDevice(it.key);
		if (device != null)
		{
			subscribeToDevice(device);
		}
	}
}


// Region: Http request handlers
def retreiveServerInfos()
{
	return [version: 1]
}

def retreiveDevicesAndRoutines() {
	def details = params.details == "true" ? true : false;

	return [
		devices: getDevices().collect { getDeviceInfos(it, details) },
		routines: location.helloHome?.getPhrases().collect { getRoutineInfos(it, details) }
	];
}

def retreiveDevice() {
	def device = getDevice(params.id);
	def details = params.details == "true" ? true : false;

	return getDeviceInfos(device, details);
}

def updateOrCreateSubscription() {
	def device = getDevice(params.id);
	def channelUri = notNull("channelUri", request.JSON?.channelUri);
	def token = notNull("token", request.JSON?.token);

	log.debug "Subscribing to device '${device.id}' (target: '${channelUri}' / token: '${token}')"

	// Get or create the push notification channel from / into the local state
	def subscriptionId = params.subscriptionId ?: UUID.randomUUID().toString() ;
	def allSubscriptions = state.pushChannels ?: (state.pushChannels = [:]);
	def deviceSubscriptions = allSubscriptions[device.id] ?: (allSubscriptions[device.id] = []);
	def subscription = deviceSubscriptions.find { it.id == subscriptionId };
	if (subscription == null)
	{
		deviceSubscriptions << [
			id: subscriptionId,
			deviceId: device.id,
			channelUri: channelUri,
			token: token
		];
	}
	else
	{
		subscription["channelUri"] = channelUri;
		subscription["token"]  = token;
	}

	log.debug "Active subscriptions: \n" + state.pushChannels.collect { "** Device ${it.key} **\n" + it.value.collect{c -> "- - - > ${c.channelUri} : ${c.token.substring(0, 10)}..."}.join('\n') + "\n***************************" }.join('\n\n')

	// (Re)create the subscription(s)
	subscribeToDevice(device)

	return [subscriptionId: subscriptionId];
}

def subscribeToDevice(device)
{
	log.debug "Subscribing to device '${device.id}'"

	unsubscribe(device);
	subscribe(device, "switch", switchStateChanged)

	if (device.hasCapability("Color Control"))
	{
		log.debug "Device '${device.id}' has also the color capability. Subscribe to it."
		subscribe(device, "color", colorStateChanged)
	}
}

def switchStateChanged(eventArgs) { sendPushNotification("switch", eventArgs) }
def colorStateChanged(eventArgs) { sendPushNotification("color", eventArgs) }

def updateDevice() {
	def device = getDevice(params.id)
	def command = notNull("command", params.command)

	log.debug "Executing '${command}' on device '${device.id}'."

	switch(command) {
		case "on":
		case "On":
			device.on()
			break

		case "off":
		case "Off":
			device.off()
			break

		case "toggle":
		case "Toggle":
			if (device.currentSwitch == "on")
				device.off();
			else
				device.on();
			break;

		default:
			httpError(501, "'${command}' is not a valid command for '${device.id}'")
	}

	return getDeviceInfos(device);
}

def executeRoutine() {
	def routine = getRoutine(params.id);
    log.debug "Executing routine '${routine.id}' (${routine.label})"

    location.helloHome?.execute(routine.id)
}

// Region: Get device
def getDevices()
{
	return switches
		+ bubls
		+ lights
		+ outlets
		+ relaySwitches;
}

def findDevice(deviceId)
{
	notNull("deviceId", deviceId);

	return getDevices().find { it.id == deviceId };
}

def getDevice(deviceId)
{
	def device = findDevice(deviceId);
	if (device == null)
	{
		httpError(404, "Device '${deviceId}' not found.")
	}
	return device;
}

// Region: Get routine
def findRoutine(routineId)
{
	return location.helloHome?.getPhrases().find{ it.id == routineId};
}

def getRoutine(routineId)
{
	def routine = findRoutine(routineId);
	if (routine == null)
	{
		httpError(404, "Routine '${routineId}' not found.")
	}
	return routine;
}

// Region: Parameters assertion helpers
def notNull(parameterName, value)
{
	if(value == null || value == "")
	{
		httpError(404, "Missing parameter '${parameterName}'.")
	}
	return value;
}

// Region: Get infos
def getDeviceInfos(device, details = false)
{
   	def infos = [
		id: device.id,
		name: device.displayName,
		state: device.currentValue("switch"),
        color: device.currentValue("color"),
        hue: device.currentValue("hue"),
        saturation: device.currentValue("saturation"),
		capabilities: device.capabilities.collect { getCapabilityInfos(it, details) }
	]

	if (details)
	{
		infos["attributes"] = device.supportedAttributes.collect { getAttributeInfos(it, details) }
		infos["commands"] = device.supportedCommands.collect { getCommandInfos(it, details) }
	}

	return infos;
}

def getCapabilityInfos(capablity, details = false)
{
	def infos = [name: capablity.name]

	if(details)
	{
		infos["attributes"] = capablity.attributes.collect { getAttributeInfos(it, details) }
		infos["commands"] = capablity.commands.collect { getCommandInfos(it, details) }
	}

	return infos;
}

def getCommandInfos(command, details = false)
{
	return [
		name: command.name,
		arguments: command.arguments
	]
}

def getAttributeInfos(attribute, details = false)
{
	return [
		name: attribute.name,
		arguments: attribute.dataType,
		values: attribute.values
	]
}

def getRoutineInfos(routine, details = false)
{
	def infos = [
    	id: routine.id,
        name: routine.label
	];

    if (details)
    {
    	infos["hasSecureActions"] = routine.hasSecureActions;
        infos["action"] = routine.action;
    }

    return infos;
}

// Region: Push notification
def sendPushNotification(capability, eventArgs)
{
	def deviceId = eventArgs.deviceId;
	log.debug "Received notification for '${capability}' for device '${deviceId}'.";

	def subscriptions = state.pushChannels.get(deviceId);
	if (subscriptions == null || subscriptions.empty)
	{
		log.error "No subscription found for device ${deviceId}, unsubscribing!";
		unsubscribe(eventArgs.device);

		return;
	}

	subscriptions.groupBy { it.channelUri }.each { sendPushNotification(capability, eventArgs, it.key, it.value) }
}

def sendPushNotification(capability, eventArgs, channelUri, subscriptions)
{
	try {
		def request = [
			uri: channelUri,
			//headers: [name: "Authorization", value: "Bearer ${subscription.token}"],
			body: [
				location: [
					id: eventArgs.locationId,
				],
				device: getDeviceInfos(eventArgs.device),
				event: [
					source: capability,
					date: eventArgs.isoDate,
					value: eventArgs.value,
					name: eventArgs.name,
				],
				subscriptions: subscriptions.collect { [id: it.id, token: it.token] }
			]
		]

		// Async post is still in beta stage ...
		httpPostJson(request) { resp -> log.debug "response: ${resp.status}." }

	} catch (e) {
		log.error "Failed to push notification: ${e}"
	}
}
Po wklejeniu kodu, klikamy „Create”. Po czym klikamy w Publish >> For Me.
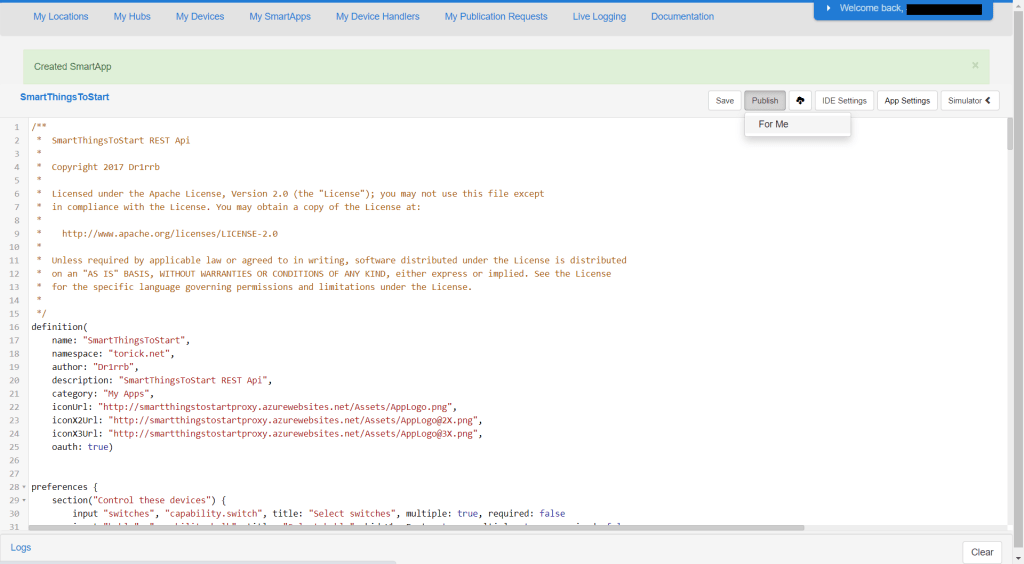
Po publikacji aplikacji. Wchodzimy w edytowanie SmartApp SmartThingsToStart.

Tutaj w sekcji „QAuth” musimy znaleźć parametry „Client ID” oraz „Client Secret”. Po czym wkleić je do aplikacji na Windowsie 10.

Po wpisaniu parametrów „Client ID” oraz „Client Secret” i kliknięciu „Continue”. Aplikacja poprosi nas o zalogowanie się do SmartThings IDE.


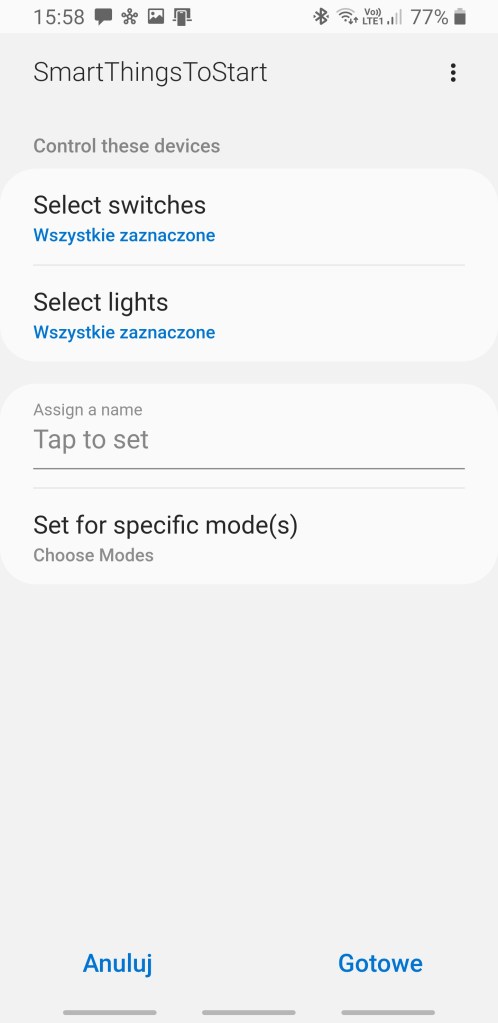
Po czym zostaniemy poproszeni o wybór lokalizacji „Dom” w moim wypadku oraz wybór urządzeń, którymi chcemy sterować z poziomu aplikacji na Windows 10. Po zakończeniu pokaże się standardowy panel aplikacji.

Wyboru urządzeń wyświetlanych w aplikacji możemy tez dokonać w oficjalnej aplikacji SmartThings na komórce.


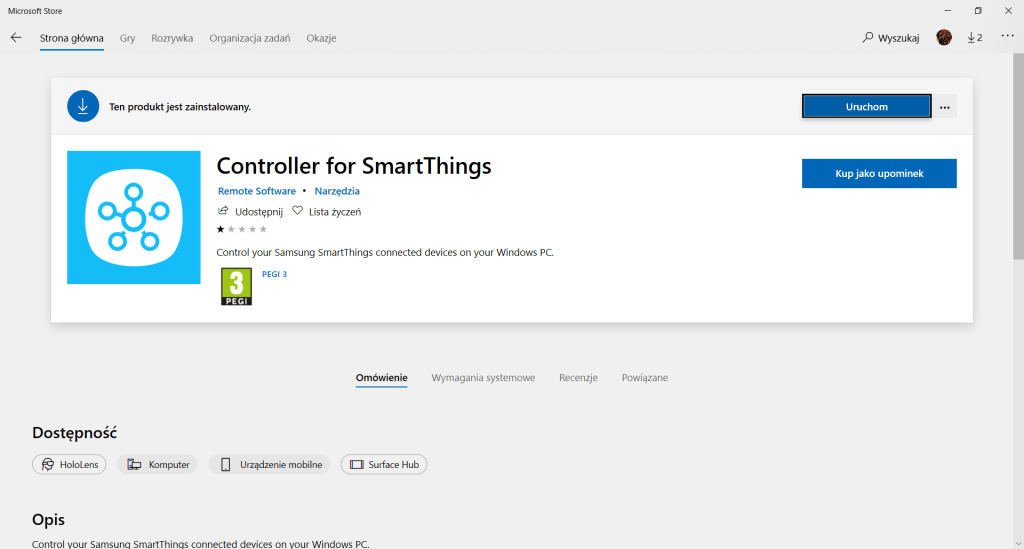
Inne aplikacje
W sklepie Microsoft Store znajdziecie płatne aplikacje rzekomo obsługujące kontrolę w ekosystemie SmartThings z poziomu komputera. Niestety aplikacje (Control for SmartThings i Controller for SmartThings) posiadają poważny błąd lub są próbą oszustwa. Nie ma możliwości przejścia pierwszego kroku konfiguracji aplikacji, dotyczącego logowania.

Znajdziecie również w sklepie oficjalną aplikację SmartThings od Samsunga, lecz jest ona dostępna tylko na sprzęt z procesorem ARM.

2 myśli na temat “Nieoficjalna bezpłatna aplikacja SmartThings na Windows 10”